Getting Started
In this section, we will cover the basics of Espanso to quickly get you started. Make sure to install Espanso before diving into the next sections.
If you are coming from a previous Espanso version (≤ 0.7.3), please read the Migration section first.
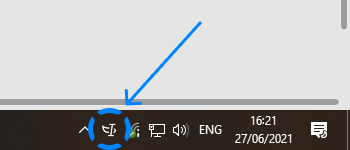
If you followed the installation correctly, Espanso should be running on your computer. For macOS and Windows users, you should now see the Espanso icon on the status bar:

![]()
Linux users can check if Espanso is running by opening a Terminal and running:
espanso status
At this point, you are ready to use Espanso! Open any typing application (like Notepad or TextEdit) and
type :espanso, you should see Hi there! appear. If you don't see it, please read the troubleshooting
section below.
If you don't see the Espanso icon on macOS or Windows, or if espanso status returned espanso is not running
on Linux, it means Espanso is not currently running on your machine.
Firstly, try starting Espanso again:
- For Windows users: click Espanso from the Start Menu, or click
START_ESPANSO.batfor Portable mode users. - For macOS users: click on the Espanso app again. If you see a security warning, please follow the steps described in the macOS installation section.
- For Linux users: open a terminal and run
espanso start
If none of these steps worked, please reinstall Espanso and try again.
Understanding Matches
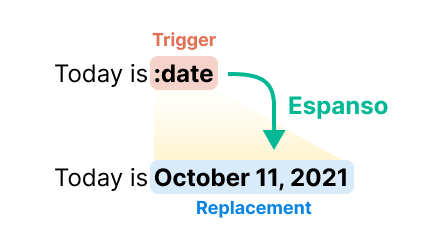
In its most basic form, Espanso detects when you type a keyword and replaces it while you are typing.
These keywords, known as triggers, are defined as simple strings. For example, :date, e',
signature and >>up are all valid triggers.

The rule that associates a trigger with the replaced text is called Match and is a core concept of Espanso. Matches are very flexible and capable of solving complex tasks. You can learn all about matches in their documentation page.
Espanso ships with very few built-in matches to give you the maximum flexibility, but you can expand its capabilities in two ways: creating your own custom matches or installing packages. Both of these options allow you to include all your code snippets in an app-specific configuration:
filter_title: "Visual Studio Code"

extra_includes:
  - "../match/_code_snippets.yml"
Because the $CONFIG/match/_code_snippets.yml file imports both JS and CSS snippets, you will be
able to use both of them in VSCode, even though you haven't included the $CONFIG/match/_js_snippets.yml
and $CONFIG/match/_css_snippets.yml directly.
Although matches are similar to the concept of snippets and templates found in other applications, they are not limited to text replacements.
Espanso's matches are more general, associating a cause with an effect. In their basic form, the cause is the user typing a keyword and the effect is Espanso inserting the replacement. But a match could also be triggered with the search bar or a keyboard shortcut*, and the effect could be inserting an image, executing a custom script and much more.
* This is not currently supported, but it's on the roadmap.
Configuration
Espanso uses a file-based configuration approach, following the Unix philosophy. All configuration files
reside in the espanso directory, whose location depends on the current OS:
- Linux:
$XDG_CONFIG_HOME/espanso(e.g./home/user/.config/espanso) - macOS:
$HOME/Library/Application Support/espanso(e.g./Users/user/Library/Application Support/espanso)- NOTE: when migrating from the previous 0.7.3 version, the configuration directory will be located in
$HOME/Library/Preferences/espansofor compatibility purposes.
- NOTE: when migrating from the previous 0.7.3 version, the configuration directory will be located in
- Windows:
{FOLDERID_RoamingAppData}\espanso(e.g.C:\Users\user\AppData\Roaming\espanso)
A quick way to find the path of your configuration folder is by using the following command:
espanso path
By default, the configuration folder is hidden on most systems. To open it, copy the path of your configuration folder and paste it in the address bar (aka path bar) of your file manager/explorer.
From now on, we'll refer to the configuration directory as $CONFIG. For example, on Windows you'll
have $CONFIG=C:\Users\user\AppData\Roaming\espanso.
While this folder may contain multiple files, let's now focus on the most important ones.
After a fresh installation, the $CONFIG directory should be structured as follows:
$CONFIG/
  config/
    default.yml
  match/
    base.yml
As you can see, there are two sub-folders, config and match, which in turn contain two files,
default.yml and base.yml respectively.
Each of them serves a specific purpose:
-
The files contained in the
matchdirectory define WHAT Espanso should do. In other words, this is where you should specify all the custom snippets and actions (aka Matches). Thematch/base.ymlfile is where you might want to start adding your matches, as shown in the following sections. As the number of snippets grows, you might want to split your matches over multiple files to make it easier to manage. For example, you might create thematch/emails.ymlfile with the snippets you use while writing emails. You can learn all about matches in the Matches section. -
The files contained in the
configdirectory define HOW Espanso should perform its expansions. In other words, this is were you should specify all Espanso's parameters and options. Theconfig/default.ymlfile defines the options that will be applied to all applications by default, unless an app-specific configuration is present for the current app. For example, you might want to enable emoji snippets for all apps in theconfig/default.ymlfile, but disable them when using Slack in theconfig/slack.ymlfile. You can learn all about configurations in the Configuration section.
All these files are defined using the widely popular YAML format.
Creating your own Matches
That's enough theory for now, let's start with some action! Let's say you write a lot of emails and you're tired of writing the greetings at the end, so you decide to speed up the process.
We will configure Espanso so that every time you type :br, it will be expanded to:
Best Regards,
Jon Snow
By now you should know that we need to define a Match.
With your favourite text editor, open the $CONFIG/match/base.yml file, introduced previously in the
Configuration section. You should see something like:
# espanso match file

# For a complete introduction, visit the official docs at: https://espanso.org/docs/

# You can use this file to define the base matches (aka snippets)
# that will be available in every application when using espanso.

# Matches are substitution rules: when you type the "trigger" string
# it gets replaced by the "replace" string.
matches:
  # Simple text replacement
  - trigger: ":espanso"
    replace: "Hi there!"
...
We need to define a new Match, so in the matches: section, add the following code:
  - trigger: ":br"
    replace: "Best Regards,\nJon Snow"
Make sure to include the indentation, otherwise it won't be valid YAML syntax. Also, prefer spaces to tabs if possible.
You should get something like:
# espanso match file

# For a complete introduction, visit the official docs at: https://espanso.org/docs/

# You can use this file to define the base matches (aka snippets)
# that will be available in every application when using espanso.

# Matches are substitution rules: when you type the "trigger" string
# it gets replaced by the "replace" string.
matches:
  # Simple text replacement
  - trigger: ":espanso"
    replace: "Hi there!"

  - trigger: ":br"
    replace: "Best Regards,\nJon Snow"
...
All right! After saving the file, Espanso should automatically detect the change and reload your configuration.
Now try to type :br anywhere. If you did everything correctly, you should see Best Regards appear!
If you are comfortable using the terminal to edit your configurations, you can also run this command:
espanso edit
which spawns an instance of the system-default text editor.
By default it uses Nano on Unix and Notepad on Windows, but you can customize it as you like. Take a look at Quick Editing for more information.
Understanding Packages
Custom matches are great, but sometimes it can be tedious to define them for every common operation, especially when you want to share them with other people.
Espanso offers an easy way to share and reuse matches with other people, packages. In fact, they are so important that Espanso includes a built-in package manager and a store, the Espanso Hub.
If you are lucky enough, someone might have already written a package to include the matches you need! Otherwise, you can create a package and publish it on the Hub, for more information check out the Packages documentation.
Installing a Package
Let's say you want to add some emojis to Espanso, such that when you type :ok it gets expanded to 👍.
A solution would be to install the Basic Emojis package from the Espanso Hub store. Open a terminal and type:
espanso install basic-emojis
Espanso should detect the change and reload the configuration automatically.
If you now type :ook into any text field, you should see 👍👍👍👍 appear!
Espanso should automatically reload the configuration after you install a package. If that doesn't happen, please open a terminal and run:
espanso restart
Useful shortcuts
Let's conclude this introduction with the most important shortcuts Espanso offers, the search-bar shortcut, the backspace undo and the toggle shortcut.
Search-bar
Espanso comes with a powerful Search-bar to quickly find and insert your matches. You can open the search bar in two ways:
- By pressing
ALT+SPACE(Option+Space on macOS). - By clicking on the status icon and then selecting "Open Search bar" (currently not available on Linux).
If you want to customize the shortcut, please check out the customizing the Search bar section.
Backspace Undo
Sometimes you might accidentally trigger an expansion. If you immediately press the BACKSPACE key after the expansion, the action is reverted and the trigger recovered.
You can also disable this behavior by adding the following line on your config/default.yml file:
undo_backspace: false
Note that backspace undo might not be always available.
Toggle Key
Sometimes you might want to disable Espanso to avoid an unwanted expansion. This can be accomplished in many ways, including the icon menu:
![]()
If you want a quicker way to toggle Espanso ON and OFF, you can also Customize the Toggle Key.
